![How to select all friends on Facebook to invite them to an event using checkboxes]()
by Kristen Haley | Social Blog
Click here for the UPDATED BLOG (5/15)!
There’s a little piece of code that does it all. This will allow you to select all of your friends on Facebook to invite them to your event rather than click, click, clicking each individually. I suggest selecting friends from a specific geographic area since you don’t want to look too spammy in Facebook’s eyes.. As I stated in one of my last posts, I have no problem with you blocking event invitations from me, especially if you’re not planning on attending any of my events in the future. I’d rather be marketing to the people who appreciate these marketing attempts 🙂 However, I do hope that these posts help supplement my clients’ (and potential clients’) need to promote their events so they can geek out a little themselves!
Now for the code/geeky stuff:
javascript:elms=document.getElementsByName("checkableitems[]");for(i=0;i<elms.length;i++){if(elms[i].type="checkbox")elms[i].click()};
(more…)
by Kristen Haley | Social Blog
So you’ve hosted a few events IRL (in real life). What happens when all of your potential guests’ attention is so deeply immersed in social media over the old mainstream resources that you’ve been used to advertising in over the years? You’re not going to reach them using your outdated tactics. It’s just a fact. You can be the most physically connected person in the world, but if you’re not able to socially/digitally leverage these connections, they’re not going to go to work for you, or help get the word out about your next event easily.
First of all, I suggest having at least 6 weeks of lead time to really publicize your event properly. It takes a while for buzz to get around town, but if you position a short and to-the-point press release properly and hit up your local content creators or aggregators with a write-up and link to your event (think newspapers, magazines, local event sites, chambers).. by blanketing your marketing and possibly offering these content creators gratis passes to your first event hinting that they write, photograph or take video around it, they may appreciate your invitation in more ways than one: first off, they’ll feel like they’re a part of something new and exciting that has a monetary worth (if paid) associated with it and secondly, you’ll be giving them another reason to create some fresh content that they’re truly interested in and :. their writing will reflect that to their readers.
FACEBOOK
 You’re going to need to have a Facebook account. At the very least, you’ll need a personal page where you may add your high school, college, past careers’ connections, colleagues, family, friends.. etc. It truly depends on what space you’re in, but if you’re planning on being an event promoter, I’d suggest adding anybody whom you’ve ever gotten a name, email address/business card from.
The bigger and the more well-optimized your online social circles are, the greater your influence and the more powerful your marketing endeavors will be. And these circles will keep on exponentially growing if you’re doing it right.
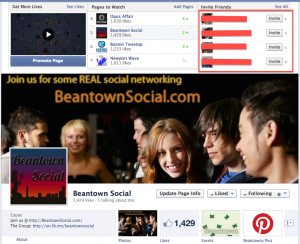
Now that you’ve added your friends to your own populated personal profile and you actually start looking like a real person in your connections’ and Facebook’s eyes, you need to create a Fan Page associated with what your organization represents. If you already have a name for your company or what you’d like to call your event series, then you can start there. Visit the Create a Page Facebook resource to continue. I’m not going to go into what you should say to brand your event or company better on these next screens, but if you do need to chat and brainstorm about these ideas, I can make myself available on a consulting basis for your brand as a whole 🙂
Once you’ve created a Fan Page, you’re going to want to add all of your friends to that page in order to build your reach. I’m skipping a few critical marketing steps like actually having awesome content for them to see and understand your message once they find your page, but time is of the essence here and we need to get the word out about your event.
EVENTBRITE
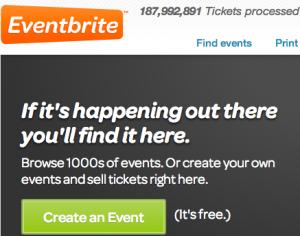 Go create an Eventbrite account. Eventbrite has processed almost 200 million tickets thus far so odds are your potential sign-ups are familiar with the way their system works. In addition, Eventbrite will streamline your social media promotions (linking fairly seamlessly to Facebook and Mailchimp email campaigns among other mediums), checking in event-goers using their app and linking up the payment process to your business or personal PayPal account or one of their other payment processing options. Here are the features and resources on how to create your first event. I’ll wait. Go read it. It’s pretty self-explanatory and shouldn’t take you that long–but if it does and you’re getting frustrated already, you can reach out to me below for a meeting.. but this is more of your immediate route.
Eventbrite also created this handy article so that you may easily publish the event you’re promoting to Facebook, personally or as your fan page. You need to do this step so your Facebook event has an obvious link to purchase or reserve tickets embedded right on the the top of your event page. ::waits patiently while you read::
SHARING
Once you have your event in order (and here’s one more Eventbrite best practices article and a Facebook events resource before we go on), you’re going to need to share it with your friends and fans of the page. Here’s a handy dandy article I wrote on a quick hack to select all of your friends (in your geographical location only please) at once to invite your friends on Facebook to your event. I swear by this method and I suggest it to all of my event-promoting clients as a super time-saver. I also highly recommend throwing a couple of Facebook advertising dollars at each event post so it will be more visible to those people who aren’t yet connected to you or your fan page, but are within a target geographical area or demographic that you’re looking to build.
Once your event is published and live on both Facebook and Eventbrite and people have been invited to it, then all you have to do is sit back and wait for your event. False. You need to create consistent content around the perks of going to your event, the people who are connected and engaging with it, pertinent images, promotions, coupons, raffles, updates.. but you can’t do this too often. If you gave yourself the proper 6 weeks, then you should market to these people from that event barely once a week until a few days before and day-of the event. The issue here is that if you send updates too early and too often, event-goers can possibly ignore your updates and notifications altogether. You don’t want them to disregard your events before they’ve really taken off.
So I think that I’ve covered about as much as I can humanly get out without giving away all of my IP.. but if you still need a little direction, I can be hired out for an hour or two call to get you on the right track. Hopefully this serves as a primer to get your teeth cut in the world of social event promotion 🙂
Like/Comment/Share if you like what I have to say!
Thanks again for reading and reaching,
Kristen

by Kristen Haley | Social Blog
I work with a lot of businesses on Facebook so :. I send out event invitations to events or to like pages on a consistent basis. I’m not sorry–I’m getting paid for this–but I want to make it easier for those of you who don’t appreciate my physically socializing this anti-social medium 🙂
Here’s a quick hack if you’d like to ignore anybody who is inviting you to events that you’re just not interested in but would still like to keep us as friends on Facebook. Let me be clear: I’m not offended by the fact that you’re ignoring my event invites; in fact, I’d rather only invite those friends who are planning on attending mine or client events in the future! Believe me, the events I promote do not suck 😉 However, if you’d rather just go to a website to see what’s going on in Newport, RI or Boston, MA, please visit these sites for tons of fun things to do in these towns:
First step: login to Facebook. You’re not going to be able to get anything done without this critical part. Der.
Secondly, visit this link to set up your blocking settings.
Here, you can:
- edit your Restricted User list
- block individual users altogether (they will not be able to see you or your activity if they’re logged in however you will not be able to see theirs as well)
- block application invites (individuals who are inviting you to Farmville or Mobsters alllll the time)
- block event invites (ding ding ding)
- block applications–especially useful if you’re getting tons of invites to Slotomania Adventures or Candy Crush Saga from multiple sources (thanks mom)
Just start adding the names of the event promoters who are inviting you to events you’d never join to your Block Application Invites section.
It’s that easy! If you like this article, please #payitfwd by commenting below <3
![How to select all friends on Facebook to invite them to an event using checkboxes]()
by Kristen Haley | Social Blog
Here are a few examples of my print marketing skills:


by Kristen Haley | Social Blog
There are many things to do to your Twitter layout to make it better for human consumption. Here are a few tips and tricks that should help you design-wise along the way 🙂
First of all, if you don’t want to go through the trouble of creating a full scaled Twitter background, I don’t blame you, it can be a major #PITA–there are so many screen types and sizes you will have to account for so it’s honestly not the worst idea in the world to do a Google Search for some free Twitter backgrounds. You can also get some free patterns and color palette ideas from COLOURlovers by Themeleon.
So moving on to your Twitter profile picture size.. It’s ideal to have a photo that’s square that’s maxxed at 500 x 500 pixels.. I suggest this number is your baseline. You’re totally welcome to upload a much higher quality photo; just keep in mind it’s going to crop it to a square. Your Twitter profile photo size will change to 73 x 73 pixels when someone’s just glancing at your profile, before they click the image to enlarge it. Also, when your photos is viewed in the home stream, you should also take note that it will resize itself to 48 x 48 pixels.
When you’re uploading any photo to the web, please remember to SEO (Search Engine Optimize, for all you newbies) the name of the file. Don’t just upload “IMG0069,” because that’s not going to ever help Google point potential searchers to your photo.
Now let’s think about your Twitter header image. Your header image should be 520 x 260 pixels. You should remember that there are certain places where your profile picture and Twitter bio content are going to be sitting.
Fill out the short form below for a free download for your own custom Twitter header. If you’d like to receive the Adobe Illustrator file, please Tweet me or leave a comment below and I’ll send it right over personally 🙂
[email-download download_id=”1″ contact_form_id=”2082″]
So that’s about it for the design… Why don’t you email me if you’d like to chat about perfecting your Twitter bio 🙂
Updated 10/27! Here’s an article from Mashable that will give you some direction when it comes down to your Bio. Please let me know in the comments section if you have any further resources you’d like to share!
by Kristen Haley | Social Blog
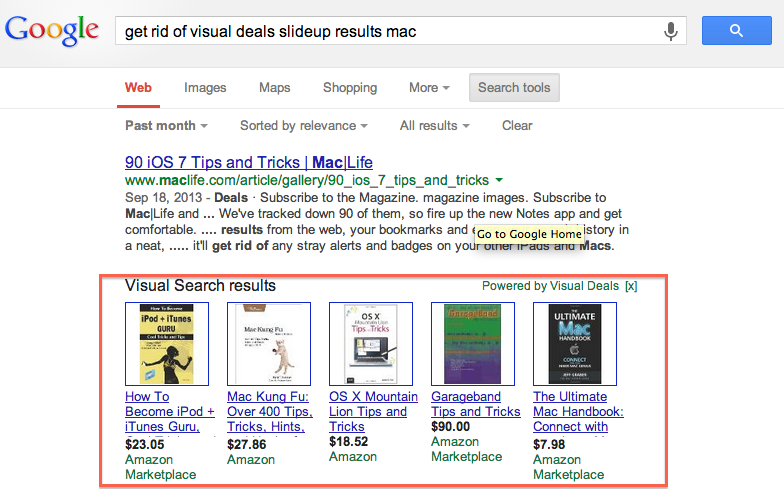
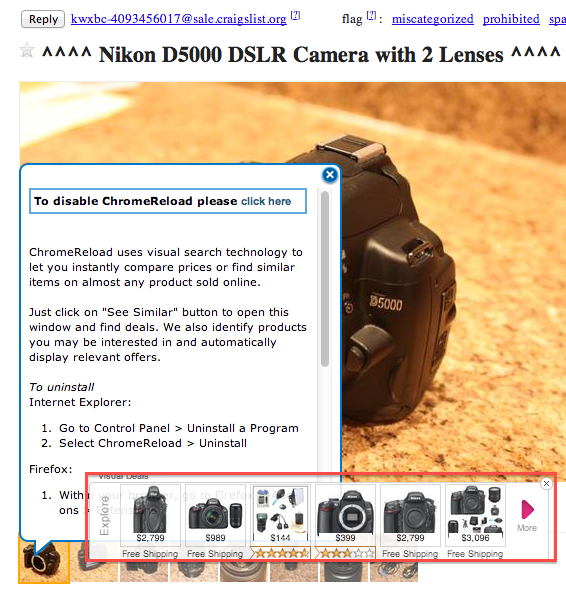
A couple of days ago, I started noticing a little popup when I visited online stores.. Amazon, Craigslist, eBay.. even Google keyword searches seemed to trigger product placement ads, even though I consistently use AdBlockPlus..
So I figured I’d do a little digging and report back on how to fix this new adware/malware issue, since when I clicked on the actual link in order to try to disable the add-on, it took me on a wild-turkey chase! I had no such Chrome Extension or Add-On called “ChromeReload,” which was mentioned when you tried to disable it directly from each page…
First of all, upon Googling this issue, I came up with this article, which stated that it was probably the “Translate selection” extension. I did not have that installed, so I had to find another reason why this damn thing was loading.
I did remember that Pinterest’s “Pin This Button” pinged me a couple of days ago, telling me that it was going to start advertising in-app. I guess I just assumed that if I logged into Pinterest.com it would start showing me ads… not necessarily embedding them in my searches!
Here’s how to remove the ads:
- Click to your settings in Chrome and then click “Extensions” on the left-hand side of your screen (that’s those three horizontal lines in the right top corner, or Window/Extensions will also get you there)
- Find “Pinterest button” and click on “Options”
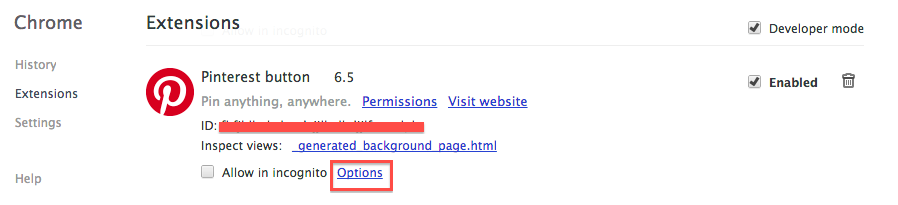
- A new tab/screen should pop up that says that Visual Deals product search is: enabled. Simply click that “Change” button to disable it.

Now just confirm that it’s gone! Go to any eCommerce site and click on a product. If you don’t see that random popup trying to get you to visit a different site, then you should be good to go 🙂
Let me know if this works for you in the comments–or if there are other Chrome Extensions we should all be weary of!
![How to select all friends on Facebook to invite them to an event using checkboxes]()
by Kristen Haley | Social Blog
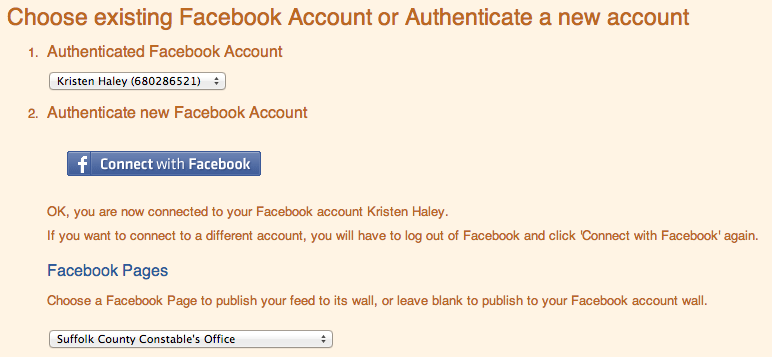
First of all, you’re going to need to have a Facebook Page (personal or business) and/or Twitter account… but preferably both. Rather than walking you through setting up those social mediums, I’m just going to delve right into the syndication 🙂
Sign up for a Twitterfeed account and add your new feed by pasting the link from the originating site/aggregate. Don’t forget to test your RSS to make sure the feed parses before continuing!
Do you have a proper RSS link? If you notice that it doesn’t seem to work, then you can always create a Feedburner account and burn it (get a proper RSS link that works) using that service.

Click to Advanced Settings. I prefer it checking for new posts every 30 minutes to an hour, and I usually post 1 or two updates each time it checks. Depending on the feed, you can include title, description or both. I also prefer to shorten links using bit.ly so I may monitor another level of analytics which will also notify me if a ton of people are clicking on one of my shortened links.

There are a lot of other advanced options here, such as posting to LinkedIn and their corresponding thumbnail images, post sorting, optional prefixes and suffixes as well as a keyword filter. I’ll be skipping on by these for this project (that’s up to your need!). Click the button that says “Continue to Step 2.“
Step 2 is where you link your services. If you are already publishing from your Facebook Page to your Twitter, then you don’t need to double up on your mediums.. Here you can choose from Twitter, Facebook (pages, personal), LinkedIn (personal only), and app.net.
Authenticate your account and find the page that you’d like to publish to.
There are a couple more UTM Tag options here, but for all intents and purposes, let’s skip that and click “Create Service.”
Now the feed should show up in your Twitterfeed Dashboard! If you know that the next posts are going to be coming out shortly, make sure you keep an eye on your feed over the next few hours to make sure it’s parsing properly.
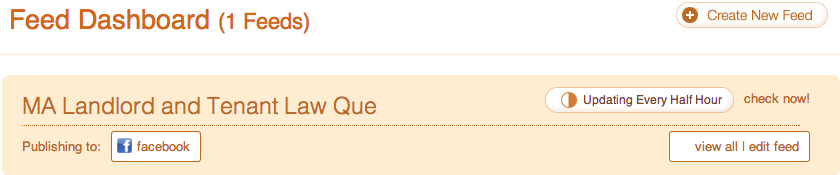
Protip: Keep an eye on your feed on a daily basis if you don’t know where it’s coming from. You could be accidentally sharing some spammy posts. and that’s not good for your Kred nor your Klout o.O
Any questions or need me to help you set it up? Message me! -kris10
![How to select all friends on Facebook to invite them to an event using checkboxes]()
by Kristen Haley | Social Blog
So you’ve been invited by your friend/employer to become an affiliate of an event to make some money promoting it. Supercool. First of all, I suggest you sign up for PayPal and opt to get a debit card so your cash can be liquid sooner than later when the affiliate money from each event has processed into your account.
You should have received an email by now that gives you a link to click in order to sign up for the program. Click “Join this program” to get started.

This will bring you to your affiliate page, where it will give you your own personal referral link which you must share in order to get credit. If you direct your friends to the original link, you will not get paid.
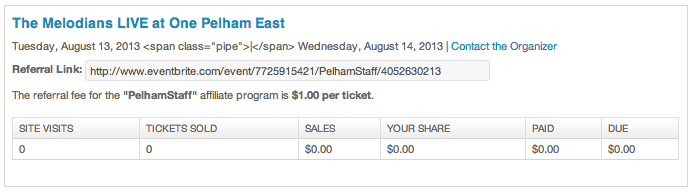
Take this link to Facebook, Google, LinkedIn, Twitter, your blog.. wherever you can post it to in order to make the most $ off of each event. If you keep an eye on your Referrals/Attendees page on Eventbrite, it will tell you how many people are clicking your link, how many tickets you’ve sold, your total sales, your share, and after the event, that which has been paid and that money which is still due.
Now rock it.
![How to select all friends on Facebook to invite them to an event using checkboxes]()
by Kristen Haley | Social Blog
 So you’ve got your event published through Eventbrite.. and you’ve created an affiliate program for your employees or random affiliates.
Here’s how you go about showing your own internal promotional program:
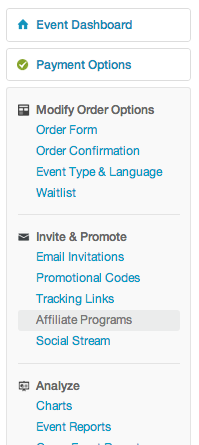
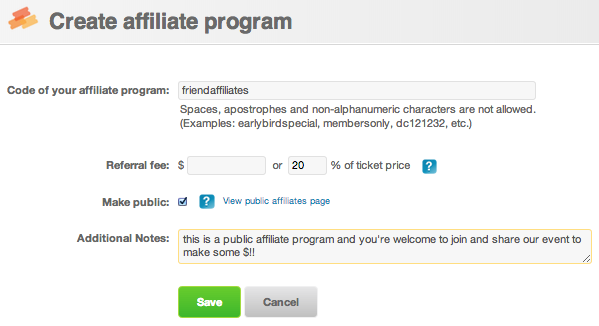 First of all log into your Eventbrite Management Dashboard, which should be available when you log in if you’ve created an event. You should have these options to the left. Click on the “Affiliate Programs” link and click the green button that says “Create a new affiliate program.”
It should bring up a screen that allows you to input a code as well as add a referral fee or % of ticket price. You can make it public if you’d like your event to possibly be picked up by local promoters and add a few notes that the affiliate will see. Save it.
If you click on the link of your affiliate name, you should be able to see a link. Copy that link and forward it to your employees in an email that sounds something like this…
“You’re invited to become an affiliate of our event and receive 20% of all of your ticket sales when people use your link to view and pay for this event. Please sign up for PayPal to get paid. To accept this invitation to become an affiliate, please visit this link and sign up to receive your customized web address. Your referrals MUST use your individualized link in order for you to be paid, so please post everywhere, such as Facebook, Twitter, LinkedIn, Google+, your blog, etc.”
….
Now let’s look at it from the standpoint of your future affiliate.
by Kristen Haley | Social Blog
Admin and Staff:
Admin:
- Create a paid event using Eventbrite
- Publish it to Facebook using the “Manage” tab
- Add a public affiliate program and offer 10-20% of ticket sales
Admin & Staff:
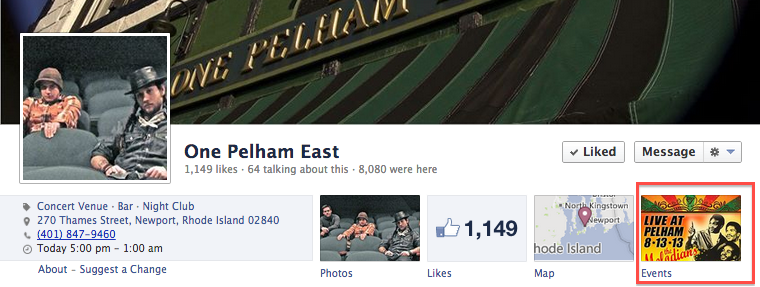
- Find the event on your company’s fan page
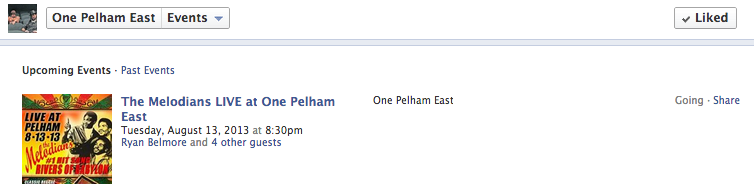
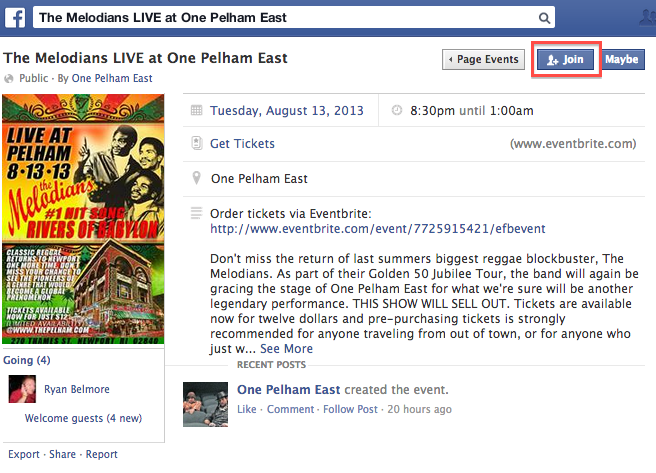
- When you join an “Invite Friends” button will show up, so click it
- Click the “Search by Name” button and scroll down to “Newport, RI”
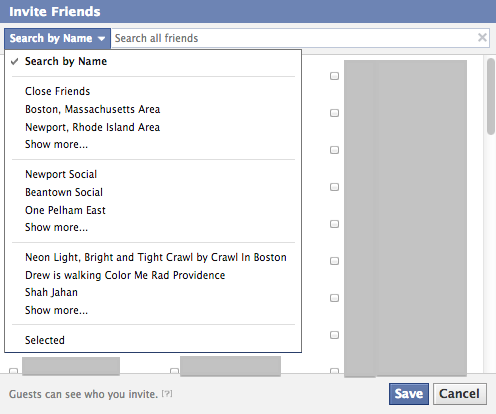
- Scroll all the way to the bottom of the list. Facebook will take it’s time populating all of your friends
- Click the black and white checkbox located on the chrome toolbar

- Then press “Save.” You may have to enter a “Capcha” to prove you’re a human
Admin:
- Give certain staff “Content Creator” privileges on your fan page
Admin & Staff with privileges:
- Download Facebook’s Pages Manager for iPhone and Android
- Take photos and video and upload them using the Pages Manager in real time
- Pre-event, find videos and photos of the band and post them to the event page
- If you have Twitter, tweet to @OnePelhamEast when you’re at the event
After the event:
- Export your email addresses into MailChimp
- Send weekly emails to past attendees or email signups with the weekly bands
- Work to grow your mailing list by making it easy for visitors
- fill out a short form by visiting a link
- or by scanning a QR code
Is this too much? Would you like to have x10industries share your event with up to 3,000 New England locals? For only $99 an event, we will set up your event on Eventbrite and Facebook and invite our masses! Contact us using the form below.