Click on the “Messenger” icon in the top right corner of the screen.
In the left sidebar, click on the “New Message” icon.
Type the names or email addresses of the people you want to include in the chat room in the “To” field.
Type a name for the chat room in the “Group Name” field.
Click on the “Create” button.
You can also set up a chat room using the Facebook Messenger app on your smartphone or tablet. To do this, open the app, tap on the “New Message” icon, and follow the same steps as above.
Once the chat room is created, you and the other participants can send messages, share photos and videos, and engage in group conversations in real-time.
To set up a Facebook chat room in a group:
Go to the group where you want to set up the chat room.
Click on the “More” button (located next to the “Post” button).
Select “Create Chat Room” from the drop-down menu.
Give your chat room a name and select the members you want to invite.
Click “Create Chat Room” to create the chat room.
Note: You must be the group admin to create a chat room in a group.
There are several benefits to creating a public event on Facebook:
Increased visibility: A public event is visible to anyone who searches for it on Facebook or visits your page, which means you can potentially reach a larger audience.
Easy RSVP tracking: Facebook allows attendees to RSVP to your event and provides a list of who has responded, making it easier for you to keep track of attendance.
Greater engagement: Public events can generate more engagement from attendees and non-attendees alike, as they can invite friends and share the event on their own timelines.
Marketing opportunities: Public events can be a powerful marketing tool, as you can invite specific groups or pages to your event and target specific demographics.
Better event planning: Public events can help you plan and organize your event more effectively, as you can see who has responded and track any updates or changes you make to the event.
To create a public event on Facebook, follow these steps:
Go to the Facebook homepage and log in to your account.
Click on the “Create” button in the top right corner of the page.
From the drop-down menu, select “Event.”
Fill in the event details, including the event name, location, date and time, and other relevant information.
Under the “Privacy” section, select “Public” to make the event visible to everyone on Facebook.
Click “Create” to create the event.
After creating the event, you can invite friends, share the event on your timeline, and post updates about the event. You can also use the event page to communicate with attendees and get feedback.
Need help or having issues with your Facebook Page? Contact us, and we’ll get you started.
Google My Business (GMB) is a free tool offered by Google that allows businesses to manage their online presence across Google, including Search and Maps. By creating and verifying a GMB listing, businesses can improve their visibility in local search results, making it easier for customers to find them online.
Having a Google My Business listing can also provide businesses with valuable insights into how customers interact with their listing, such as how many people are searching for the business, how they found it, and how they engage with the business on Google. This can be helpful for businesses looking to understand and improve their online presence.
Overall, GMB is a valuable tool for businesses of all sizes looking to increase their online visibility, connect with customers, and gain insights into their online presence.
Google My Business updates are a great way to keep your business information accurate and up-to-date on Google. Here are some tips for effectively using GMB updates:
Keep your business information accurate and up-to-date: Make sure your business name, address, phone number, and website are all correct and current.
Respond to customer reviews: Use GMB to respond to customer reviews and address any concerns or issues they may have. This helps to build trust with potential customers and shows that you value their feedback.
Add photos and videos: Use GMB to add photos and videos of your business, products, and services. This helps to give potential customers a better idea of what you offer and what they can expect when they visit your business.
Keep your business hours accurate: Make sure to update your business hours on GMB if they change, so potential customers know when they can visit your business.
Use GMB to announce promotions or special events: Use GMB updates to announce promotions or special events, such as sales or discounts, to attract new customers.
By using GMB updates effectively, you can help improve your business’s visibility on Google and attract more customers.
Contact us to discuss how we can help you share your news on Google My Business!
Spam prevention is important for several reasons. First and foremost, it helps to protect your website and its users from harmful or malicious content. Spam comments or messages can contain links to phishing sites or other websites that can compromise the security of your site and its users. Spam can also clog up your website’s comment sections or forums, making it difficult for genuine users to have meaningful discussions.
Additionally, spam can damage your website’s reputation and credibility. Visitors may see your site as unreliable or untrustworthy if your site is overrun with spam. This can lead to a decrease in traffic and engagement and may even cause some users to avoid your site altogether.
Implementing spam prevention measures can help to protect your website and its users from these potential issues and can help to maintain the integrity and reputation of your site. There are several different spam prevention measures that you can take, such as implementing CAPTCHAs or using spam filters to block known spam sources.
There are several free alternatives to Akismet that you can use to help prevent spam on your WordPress website:
Antispam Bee: This plugin uses various techniques to help identify and block spam comments, including checking the IP address and referring website of the comment author.
WP-SpamShield: This plugin uses advanced algorithms and techniques to detect and block spam comments, and it also includes an option to block trackbacks and pingbacks.
CleanTalk: This plugin uses various techniques to identify and block spam comments, including checking the comment author’s IP address and email address.
Akismet Alternative: This plugin is designed as a drop-in replacement for Akismet and uses similar techniques to identify and block spam comments.
WPBruiser: This plugin helps prevent spam comments by adding a CAPTCHA to your comment form and includes features to help prevent brute-force attacks on your login form.
It’s important to note that no spam prevention plugin is foolproof, so it’s always a good idea to regularly review and delete any spam comments that do get through.
There are several reasons to migrate to Google Analytics 4.
Enhanced data privacy
Google Analytics 4 offers more privacy controls, such as the ability to anonymize IP addresses and the ability to opt out of data collection.
More robust data collection
Google Analytics 4 uses machine learning algorithms to automatically categorize and label data, making it easier to analyze and understand.
Enhanced measurement capabilities
Google Analytics 4 offers more advanced measurement capabilities, including the ability to track events across devices and the ability to track offline conversions.
Improved user experience
Google Analytics 4 has a more user-friendly interface, making it easier for users to navigate and find the information they need.
Future-proofing your analytics
Google Analytics 4 is the future of Google’s analytics platform, so it’s important to migrate now to ensure you are using the most up-to-date and advanced analytics tool.
Migrating from Google Analytics 3 to Google Analytics 4
GA3, also known as Universal Analytics, –> GA4, or Google Analytics for Firebase, involves the following steps:
Set up a Google Analytics 4 property in your Google Analytics account.
Install the Google Analytics 4 tracking code on your website or app.
Set up any desired events to track in your GA4 property.
(Optional) Set up conversion tracking in your GA4 property.
(Optional) Use the measurement protocol or a server-side integration to send data from non-web or non-mobile apps to your GA4 property.
(Optional) Use the data import feature to bring data from other sources, such as CRM systems or offline event data.
It’s important to note that GA4 has a different data model and features than Universal Analytics, so you may need to adjust your tracking and analysis approaches after the migration.
Need help? Contact us and we’ll get you migrated this week!
There are several reasons why a company might want to have an interactive website for their brand:
Improved user experience: An interactive website allows users to engage with the brand in a more meaningful way. They can explore different parts of the site, access information easily, and interact with the brand in ways that a static website would not allow. This can lead to a more positive experience for the user, which can translate into increased brand loyalty.
Increased engagement: Interactive websites allow users to engage with the brand in real-time, which can lead to increased engagement and a sense of community. This can be especially useful for companies that want to build a loyal customer base.
Increased conversions: By providing a more engaging and interactive experience, a company’s website can increase the likelihood of users taking a desired action, such as making a purchase or signing up for a newsletter. This can lead to increased conversions and ultimately, higher revenue for the company.
Improved search engine rankings: Search engines often prioritize websites that provide a good user experience, and an interactive website can be a key factor in this. By providing an engaging and interactive experience, a company’s website may be more likely to rank highly in search engine results, which can lead to increased traffic and visibility for the brand.
So Facebook has gone ahead and changed their algorithm again on us. Surprise surprise. At least one company came out with a cool tool (even if the better version is paid) to select all friends at once. If you don’t want to pay, they’ll allow you to select 15 at a time, and unfortunately with the way Facebook works, you can only invite a certain # (450 for me but this varies from person to person) at a time each time.. so you’re going to have to be patient and/or really segment your lists to create a bigger impact each time you invite 🙂
You’re going to need Chrome. Open this link up in your Google Chrome browser and run the script. Keep in mind that if you have a ton of friends, it’s going to freeze your screen for a few moments…
Facebook fan pages are a great way to make your business discoverable, connected, timely and insightful. You should post early and often as your target market could be listening. I use Facebook advertising to boost and target certain posts that I believe are relevant to people who could be buying from me on a consistent basis. Here’s a quick primer once you have already established a Facebook brand page. If you haven’t, please bookmark this post then click here to create your first company page.
Facebook offers a number of different options in creating your first page. If you have a physical location, click Local Business or Place. If you’re a Company, Organization or Institution without a physical location that people come to for service, click that button. A Brand or Product is like Nike or Budweiser. Artists, Bands or Public Figures if you’re a musician, politician or a writer. Entertainment if you are starting up a TV show, movie or are marketing a book not as a writer. Cause or Community if you’re a non-profit or have a networking group. There are tons of reasons to create your page to promote you or your idea, brand, product or service.. so pick what’s right for you. You can change it in the future if you do end up with a storefront or change to a non-profit. There are also sub-categories which you’ll have to choose from so choose wisely 🙂
Once you’ve created your page, you should add a square profile photo and a cover photo. This will help people identify with your brand. At the top of your screen, you will see all of the tabs at the top so you can monitor your engagement as well as edit your settings. You can also start posting and scheduling posts–and I suggest adding photos, videos and other rich content so that it’s viewed and shared more often. Research has proven that social photos generate more engagement and are currently the primary type of content posted and shared on Facebook. Share high-quality photos that interest your target market to get the most bang for your buck, especially if you’re going to boost your post.
You’re going to want to populate your About section (click the About tab next to the Timeline link). This is where you are able to add when you were founded or started, your descriptions, add your website and optimize your Facebook web address. There are more options if you’re a physical location (like parking, hours, transit, location), and these fields all depend on what you choose on that first page. Populate it to the best of your knowledge and it won’t kill you to leave a field blank.
*sidenote* Do you notice that little “Hootlet” button on my page? That’s because I use a program called Hootsuite to buffer my posts out to the future or send them to multiple social mediums at once. While this program is free up to 3 social accounts, I actually pay for the upgraded version since I want to connect my (multiple) Facebook, LinkedIn, Twitter, Google+ and more…
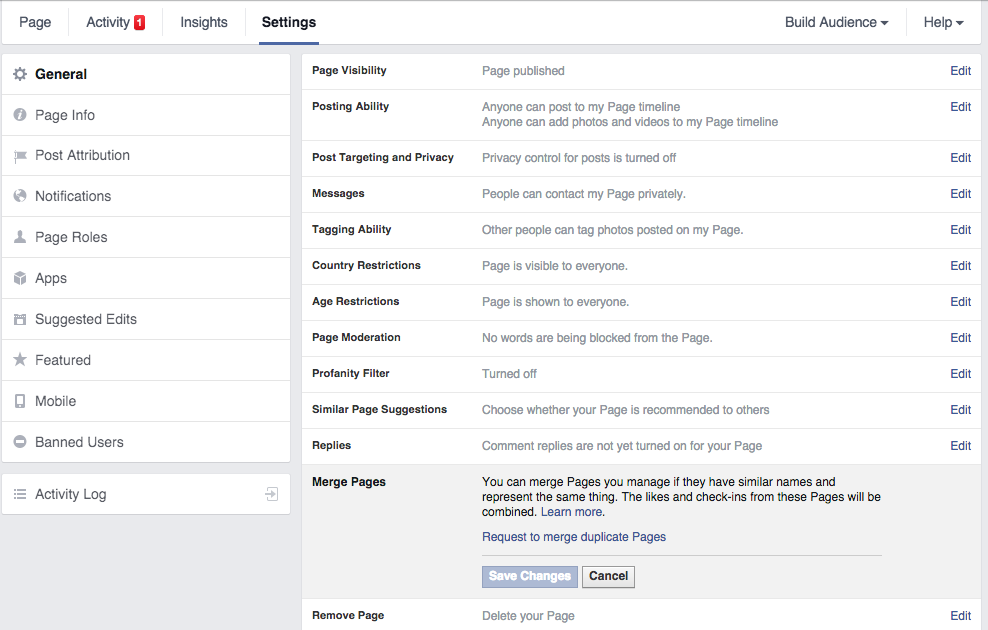
Moving on… Settings. Top right of the screen will allow you to really hone down on what’s going on with your page and the way you communicate with the Facebook world. Do you wish to limit the age range? Do you want the profanity/moderation turned on or off? Do you have access to more than one page of yours and you’d like to merge them? There are a ton of features you can toggle here, and it’s going to be different for every situation. Poke around.
Posting elsewhere: You may want to post as your Facebook page and not as yourself in some instances off of your fan page. To act as your page on Facebook, click on the settings icon in the top right corner of your profile and you can “Use Facebook as a page,” to see on your news feed updates from businesses your page follows instead of your friends and page likes. Then simply like & comment if you see relevant content, and get noticed by other brands’ followers!
Insights: Here, you’ll be able to monitor what works with your posts and understand the people who like your page so you’ll be able to make the decisions about the best way to keep connecting with them. The first time you click this tab, it will take you on a journey to let you know how to use this section to it’s extent.
Messages: You can turn this on or off. I like to keep it on so that people can communicate through that button rather than trying to figure out the best way to reach you. Otherwise, a newer feature is the ability to create a new “Call to Action” button, to send people to your store, contact you directly on your site, download your app or have them sign up for your email list or event, watch a video, book services now or if you’d like to play a game.
Ads. I can go on for a while about ads but here’s a handy dandy article as to how you may want to approach spending money on this medium. Firstly, you should have a landing page and not just send people to the home page of your site, if you’re not just putting the money in boosting your Facebook fan page.. but that’s another post for another time. GATHER email addresses don’t just throw a bunch of $$ at getting people to your home page without a proper call to action and a form.
Facebook Pages Terms: Since Facebook seems to change their terms and page responsibilities on a continuous basis, you may want to bookmark this page and go back to it if you have questions as to what not to do.
Apps… this is another topic for another day. There are tons of apps that can monitor and engage with people.. some free, some paid. Here’s a handy dandy apps tool list to customize your Facebook page. It’s far from complete, but at least it can give you an idea as to the power that can go behind adding another tab to your page.
I hope this has been a proper lesson on learning some of the basic functionalities of your Fan Page! If you have any questions, please contact me and I’ll try to answer them in a timely manner 🙂 Or maybe just link you to another helpful article 😉
First of all, I’m going to let you in on my little secret. I get A LOT of my business from LinkedIn. I have gotten clients from all over the globe from a degree or two of separation just from adding every email address from every business card or personal or professional email I’ve received or communicated with over the past 7 years. I understand that not everybody is going to be as aggressive as I have been in growing this sphere of influence, or their business is more locally-oriented and they’re more private people, but for a self-employed person who can technically work anywhere, this is my social medium of choice for virtual B2B networking and prospecting. Would you like to follow along? Click here for my LinkedIn profile.
So let’s jump right on in and start with the first thing that people will see when they click to your profile while on a PC/Mac (not tablet/phone). I attribute this to be the most important real estate that you have to sell yourself. To get to this part of LinkedIn, hover over your photo on the top right and click your name. You will also open up an editable profile if you hover over the white Profile link on the bar below the LinkedIn logo, which is slightly different but will also do the job. Here, you’ll see that you have you photo, tagline, physical location (city, state or greater xx area), current and most recent previous companies, the amount of connections you have (500+ could mean anything over 500), your shortlink and your summary. If you hover over any of these items, a little pencil will show up so you may edit them. You also have the option to upload a cover photo (I suggest something repeatable or a color that represents you).
Your photo does tell a thousand words. Use something personable, friendly, crisp, clean.. I actually decided to use this one since I got over 100 “likes” on Facebook when I uploaded it. If people like your photo on a social medium where you can gauge how it’s received, then it will make it easier for you to choose.
Notice all the ads. They’re irrelevant to this primer but they are most always related to what you’re putting in your profile and what you’re searching for. If you do decide to unlock a Premium membership by paying, make sure you have the right verbiage in initial marketing emails/landing pages/analytics/drip campaigns set up to measure the return on your investment. Don’t just buy something you’re not going to use properly. PS I can help with that 😉
Let’s chat a little bit more about that summary. This part is up to you. Do you want it to reflect your personality or do you want it to be 100% business? I believe that I’m selling to humans, and humans want to be appreciated and not talked down to, especially in a techish business. I try to keep mine friendly and humble.. and at the end, I mention a whole BUNCH of keyword phrases that will make me easily searchable in that top white box 🙂
Below, you will see an image–that’s the first image that it pulls from the link to whichever site you’ve linked to it. If you notice, that’s the top image on my homepage. A landing page would probably be a better idea if you’ve got one built, but I’m keeping this fairly simple.
Please stay tuned for my next blog post, Experience–or if you would like to sign up for my emails, fill out the form below!
It was only a matter of time before two people asked me the same question in one week, so I figured I’d just write a quick blog about merging your Facebook company pages 🙂
It’s a great idea to do since all of your reviews, ratings and check-ins will be combined (think of potentially exponentially growing your following in one fell swoop)–but keep in mind that the username, posts and photos will be deleted from the page that is merged from. There is no “undo” button here, people, so please make sure you do it right the first time!
First of all, make sure you have administrative access to all of the pages you’d like to merge. You can do a quick check of all the pages you manage by clicking here. Unfortunately this can be a hugely difficult task and take weeks to months of your valuable time. Facebook may even ask you for some ridiculous information to make sure it’s your IP.. including but not limited to calling you to make sure the # is correctly on file (this is the absolute easiest way to go about the process) or by submitting documentation which could include:
A utility bill for your place of business
Your local business license (issued by your city, county, state, etc.)
A tax file for your business
Certificate of Formation (for a partnership)
Articles of Incorporation (for a corporation)
Basically putting through a Place Claim Request is a huge pain in the a$$. And a waste of time and money it seems.. but really, it’s something that needs to be done so you may funnel all of your potential leads to the real page upon which you’ll be concentrating all of your marketing.
Here are some more quick links if you’re having an issue getting past this vital step:
So you go through the process of selecting your initial page that you want to KEEP and click that you Acknowledge that you will yadda yadda yadda wait up to 14 days and they have to both be published.. just read the fine print if you’re not sure what you’re doing please.
Then, you’ll have the opportunity to pick up to 5 pages you’d like to merge into your destination page. Once again, you can only merge those pages which you admin, so please go back to the step mentioned above if that’s not the case.
Click “Send.” Boom. Done. Well after waiting like 14 days if the pages aren’t similar, or potentially more if Facebook wants to give you a hard time. What else is new?
IF you’re having a hard time merging your pages after reading this article, please Contact x10industries and we’ll work with you to get this sorted out 🙂
Have a fantastic day and please feel free to comment with your Fan Page address so we may like it!


 Facebook offers a number of different options in creating your first page. If you have a physical location, click Local Business or Place. If you’re a Company, Organization or Institution without a physical location that people come to for service, click that button. A Brand or Product is like Nike or Budweiser. Artists, Bands or Public Figures if you’re a musician, politician or a writer. Entertainment if you are starting up a TV show, movie or are marketing a book not as a writer. Cause or Community if you’re a non-profit or have a networking group. There are tons of reasons to create your page to promote you or your idea, brand, product or service.. so pick what’s right for you. You can change it in the future if you do end up with a storefront or change to a non-profit. There are also sub-categories which you’ll have to choose from so choose wisely 🙂
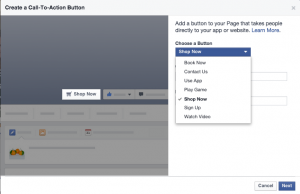 Messages: You can turn this on or off. I like to keep it on so that people can communicate through that button rather than trying to figure out the best way to reach you. Otherwise, a newer feature is the ability to create a new “Call to Action” button, to send people to your store, contact you directly on your site, download your app or have them sign up for your email list or event, watch a video, book services now or if you’d like to play a game.
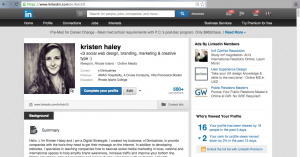
 Let’s chat a little bit more about that summary. This part is up to you. Do you want it to reflect your personality or do you want it to be 100% business? I believe that I’m selling to humans, and humans want to be appreciated and not talked down to, especially in a techish business. I try to keep mine friendly and humble.. and at the end, I mention a whole BUNCH of keyword phrases that will make me easily searchable in that top white box 🙂