Click on the “Messenger” icon in the top right corner of the screen.
In the left sidebar, click on the “New Message” icon.
Type the names or email addresses of the people you want to include in the chat room in the “To” field.
Type a name for the chat room in the “Group Name” field.
Click on the “Create” button.
You can also set up a chat room using the Facebook Messenger app on your smartphone or tablet. To do this, open the app, tap on the “New Message” icon, and follow the same steps as above.
Once the chat room is created, you and the other participants can send messages, share photos and videos, and engage in group conversations in real-time.
To set up a Facebook chat room in a group:
Go to the group where you want to set up the chat room.
Click on the “More” button (located next to the “Post” button).
Select “Create Chat Room” from the drop-down menu.
Give your chat room a name and select the members you want to invite.
Click “Create Chat Room” to create the chat room.
Note: You must be the group admin to create a chat room in a group.
So Facebook has gone ahead and changed their algorithm again on us. Surprise surprise. At least one company came out with a cool tool (even if the better version is paid) to select all friends at once. If you don’t want to pay, they’ll allow you to select 15 at a time, and unfortunately with the way Facebook works, you can only invite a certain # (450 for me but this varies from person to person) at a time each time.. so you’re going to have to be patient and/or really segment your lists to create a bigger impact each time you invite 🙂
You’re going to need Chrome. Open this link up in your Google Chrome browser and run the script. Keep in mind that if you have a ton of friends, it’s going to freeze your screen for a few moments…
First of all, I’m going to let you in on my little secret. I get A LOT of my business from LinkedIn. I have gotten clients from all over the globe from a degree or two of separation just from adding every email address from every business card or personal or professional email I’ve received or communicated with over the past 7 years. I understand that not everybody is going to be as aggressive as I have been in growing this sphere of influence, or their business is more locally-oriented and they’re more private people, but for a self-employed person who can technically work anywhere, this is my social medium of choice for virtual B2B networking and prospecting. Would you like to follow along? Click here for my LinkedIn profile.
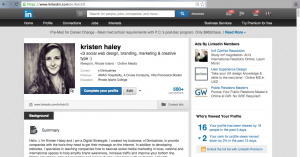
So let’s jump right on in and start with the first thing that people will see when they click to your profile while on a PC/Mac (not tablet/phone). I attribute this to be the most important real estate that you have to sell yourself. To get to this part of LinkedIn, hover over your photo on the top right and click your name. You will also open up an editable profile if you hover over the white Profile link on the bar below the LinkedIn logo, which is slightly different but will also do the job. Here, you’ll see that you have you photo, tagline, physical location (city, state or greater xx area), current and most recent previous companies, the amount of connections you have (500+ could mean anything over 500), your shortlink and your summary. If you hover over any of these items, a little pencil will show up so you may edit them. You also have the option to upload a cover photo (I suggest something repeatable or a color that represents you).
Your photo does tell a thousand words. Use something personable, friendly, crisp, clean.. I actually decided to use this one since I got over 100 “likes” on Facebook when I uploaded it. If people like your photo on a social medium where you can gauge how it’s received, then it will make it easier for you to choose.
Notice all the ads. They’re irrelevant to this primer but they are most always related to what you’re putting in your profile and what you’re searching for. If you do decide to unlock a Premium membership by paying, make sure you have the right verbiage in initial marketing emails/landing pages/analytics/drip campaigns set up to measure the return on your investment. Don’t just buy something you’re not going to use properly. PS I can help with that 😉
Let’s chat a little bit more about that summary. This part is up to you. Do you want it to reflect your personality or do you want it to be 100% business? I believe that I’m selling to humans, and humans want to be appreciated and not talked down to, especially in a techish business. I try to keep mine friendly and humble.. and at the end, I mention a whole BUNCH of keyword phrases that will make me easily searchable in that top white box 🙂
Below, you will see an image–that’s the first image that it pulls from the link to whichever site you’ve linked to it. If you notice, that’s the top image on my homepage. A landing page would probably be a better idea if you’ve got one built, but I’m keeping this fairly simple.
Please stay tuned for my next blog post, Experience–or if you would like to sign up for my emails, fill out the form below!

 Let’s chat a little bit more about that summary. This part is up to you. Do you want it to reflect your personality or do you want it to be 100% business? I believe that I’m selling to humans, and humans want to be appreciated and not talked down to, especially in a techish business. I try to keep mine friendly and humble.. and at the end, I mention a whole BUNCH of keyword phrases that will make me easily searchable in that top white box 🙂