Facebook fan pages are a great way to make your business discoverable, connected, timely and insightful. You should post early and often as your target market could be listening. I use Facebook advertising to boost and target certain posts that I believe are relevant to people who could be buying from me on a consistent basis. Here’s a quick primer once you have already established a Facebook brand page. If you haven’t, please bookmark this post then click here to create your first company page.
 Facebook offers a number of different options in creating your first page. If you have a physical location, click Local Business or Place. If you’re a Company, Organization or Institution without a physical location that people come to for service, click that button. A Brand or Product is like Nike or Budweiser. Artists, Bands or Public Figures if you’re a musician, politician or a writer. Entertainment if you are starting up a TV show, movie or are marketing a book not as a writer. Cause or Community if you’re a non-profit or have a networking group. There are tons of reasons to create your page to promote you or your idea, brand, product or service.. so pick what’s right for you. You can change it in the future if you do end up with a storefront or change to a non-profit. There are also sub-categories which you’ll have to choose from so choose wisely 🙂
 Once you’ve created your page, you should add a square profile photo and a cover photo. This will help people identify with your brand. At the top of your screen, you will see all of the tabs at the top so you can monitor your engagement as well as edit your settings. You can also start posting and scheduling posts–and I suggest adding photos, videos and other rich content so that it’s viewed and shared more often. Research has proven that social photos generate more engagement and are currently the primary type of content posted and shared on Facebook. Share high-quality photos that interest your target market to get the most bang for your buck, especially if you’re going to boost your post.
You’re going to want to populate your About section (click the About tab next to the Timeline link). This is where you are able to add when you were founded or started, your descriptions, add your website and optimize your Facebook web address. There are more options if you’re a physical location (like parking, hours, transit, location), and these fields all depend on what you choose on that first page. Populate it to the best of your knowledge and it won’t kill you to leave a field blank.
*sidenote* Do you notice that little “Hootlet” button on my page? That’s because I use a program called Hootsuite to buffer my posts out to the future or send them to multiple social mediums at once. While this program is free up to 3 social accounts, I actually pay for the upgraded version since I want to connect my (multiple) Facebook, LinkedIn, Twitter, Google+ and more…
Moving on… Settings. Top right of the screen will allow you to really hone down on what’s going on with your page and the way you communicate with the Facebook world. Do you wish to limit the age range? Do you want the profanity/moderation turned on or off? Do you have access to more than one page of yours and you’d like to merge them? There are a ton of features you can toggle here, and it’s going to be different for every situation. Poke around.
Posting elsewhere: You may want to post as your Facebook page and not as yourself in some instances off of your fan page. To act as your page on Facebook, click on the settings icon in the top right corner of your profile and you can “Use Facebook as a page,” to see on your news feed updates from businesses your page follows instead of your friends and page likes. Then simply like & comment if you see relevant content, and get noticed by other brands’ followers!
Insights: Here, you’ll be able to monitor what works with your posts and understand the people who like your page so you’ll be able to make the decisions about the best way to keep connecting with them. The first time you click this tab, it will take you on a journey to let you know how to use this section to it’s extent.
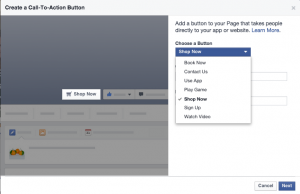 Messages: You can turn this on or off. I like to keep it on so that people can communicate through that button rather than trying to figure out the best way to reach you. Otherwise, a newer feature is the ability to create a new “Call to Action” button, to send people to your store, contact you directly on your site, download your app or have them sign up for your email list or event, watch a video, book services now or if you’d like to play a game.
Ads. I can go on for a while about ads but here’s a handy dandy article as to how you may want to approach spending money on this medium. Firstly, you should have a landing page and not just send people to the home page of your site, if you’re not just putting the money in boosting your Facebook fan page.. but that’s another post for another time. GATHER email addresses don’t just throw a bunch of $$ at getting people to your home page without a proper call to action and a form.
Facebook Pages Terms: Since Facebook seems to change their terms and page responsibilities on a continuous basis, you may want to bookmark this page and go back to it if you have questions as to what not to do.
Apps… this is another topic for another day. There are tons of apps that can monitor and engage with people.. some free, some paid. Here’s a handy dandy apps tool list to customize your Facebook page. It’s far from complete, but at least it can give you an idea as to the power that can go behind adding another tab to your page.
I hope this has been a proper lesson on learning some of the basic functionalities of your Fan Page! If you have any questions, please contact me and I’ll try to answer them in a timely manner 🙂 Or maybe just link you to another helpful article 😉