So Facebook has gone ahead and changed their algorithm again on us. Surprise surprise. At least one company came out with a cool tool (even if the better version is paid) to select all friends at once. If you don’t want to pay, they’ll allow you to select 15 at a time, and unfortunately with the way Facebook works, you can only invite a certain # (450 for me but this varies from person to person) at a time each time.. so you’re going to have to be patient and/or really segment your lists to create a bigger impact each time you invite 🙂
You’re going to need Chrome. Open this link up in your Google Chrome browser and run the script. Keep in mind that if you have a ton of friends, it’s going to freeze your screen for a few moments…
Facebook fan pages are a great way to make your business discoverable, connected, timely and insightful. You should post early and often as your target market could be listening. I use Facebook advertising to boost and target certain posts that I believe are relevant to people who could be buying from me on a consistent basis. Here’s a quick primer once you have already established a Facebook brand page. If you haven’t, please bookmark this post then click here to create your first company page.
Facebook offers a number of different options in creating your first page. If you have a physical location, click Local Business or Place. If you’re a Company, Organization or Institution without a physical location that people come to for service, click that button. A Brand or Product is like Nike or Budweiser. Artists, Bands or Public Figures if you’re a musician, politician or a writer. Entertainment if you are starting up a TV show, movie or are marketing a book not as a writer. Cause or Community if you’re a non-profit or have a networking group. There are tons of reasons to create your page to promote you or your idea, brand, product or service.. so pick what’s right for you. You can change it in the future if you do end up with a storefront or change to a non-profit. There are also sub-categories which you’ll have to choose from so choose wisely 🙂
Once you’ve created your page, you should add a square profile photo and a cover photo. This will help people identify with your brand. At the top of your screen, you will see all of the tabs at the top so you can monitor your engagement as well as edit your settings. You can also start posting and scheduling posts–and I suggest adding photos, videos and other rich content so that it’s viewed and shared more often. Research has proven that social photos generate more engagement and are currently the primary type of content posted and shared on Facebook. Share high-quality photos that interest your target market to get the most bang for your buck, especially if you’re going to boost your post.
You’re going to want to populate your About section (click the About tab next to the Timeline link). This is where you are able to add when you were founded or started, your descriptions, add your website and optimize your Facebook web address. There are more options if you’re a physical location (like parking, hours, transit, location), and these fields all depend on what you choose on that first page. Populate it to the best of your knowledge and it won’t kill you to leave a field blank.
*sidenote* Do you notice that little “Hootlet” button on my page? That’s because I use a program called Hootsuite to buffer my posts out to the future or send them to multiple social mediums at once. While this program is free up to 3 social accounts, I actually pay for the upgraded version since I want to connect my (multiple) Facebook, LinkedIn, Twitter, Google+ and more…
Moving on… Settings. Top right of the screen will allow you to really hone down on what’s going on with your page and the way you communicate with the Facebook world. Do you wish to limit the age range? Do you want the profanity/moderation turned on or off? Do you have access to more than one page of yours and you’d like to merge them? There are a ton of features you can toggle here, and it’s going to be different for every situation. Poke around.
Posting elsewhere: You may want to post as your Facebook page and not as yourself in some instances off of your fan page. To act as your page on Facebook, click on the settings icon in the top right corner of your profile and you can “Use Facebook as a page,” to see on your news feed updates from businesses your page follows instead of your friends and page likes. Then simply like & comment if you see relevant content, and get noticed by other brands’ followers!
Insights: Here, you’ll be able to monitor what works with your posts and understand the people who like your page so you’ll be able to make the decisions about the best way to keep connecting with them. The first time you click this tab, it will take you on a journey to let you know how to use this section to it’s extent.
Messages: You can turn this on or off. I like to keep it on so that people can communicate through that button rather than trying to figure out the best way to reach you. Otherwise, a newer feature is the ability to create a new “Call to Action” button, to send people to your store, contact you directly on your site, download your app or have them sign up for your email list or event, watch a video, book services now or if you’d like to play a game.
Ads. I can go on for a while about ads but here’s a handy dandy article as to how you may want to approach spending money on this medium. Firstly, you should have a landing page and not just send people to the home page of your site, if you’re not just putting the money in boosting your Facebook fan page.. but that’s another post for another time. GATHER email addresses don’t just throw a bunch of $$ at getting people to your home page without a proper call to action and a form.
Facebook Pages Terms: Since Facebook seems to change their terms and page responsibilities on a continuous basis, you may want to bookmark this page and go back to it if you have questions as to what not to do.
Apps… this is another topic for another day. There are tons of apps that can monitor and engage with people.. some free, some paid. Here’s a handy dandy apps tool list to customize your Facebook page. It’s far from complete, but at least it can give you an idea as to the power that can go behind adding another tab to your page.
I hope this has been a proper lesson on learning some of the basic functionalities of your Fan Page! If you have any questions, please contact me and I’ll try to answer them in a timely manner 🙂 Or maybe just link you to another helpful article 😉
First of all, I’m going to let you in on my little secret. I get A LOT of my business from LinkedIn. I have gotten clients from all over the globe from a degree or two of separation just from adding every email address from every business card or personal or professional email I’ve received or communicated with over the past 7 years. I understand that not everybody is going to be as aggressive as I have been in growing this sphere of influence, or their business is more locally-oriented and they’re more private people, but for a self-employed person who can technically work anywhere, this is my social medium of choice for virtual B2B networking and prospecting. Would you like to follow along? Click here for my LinkedIn profile.
So let’s jump right on in and start with the first thing that people will see when they click to your profile while on a PC/Mac (not tablet/phone). I attribute this to be the most important real estate that you have to sell yourself. To get to this part of LinkedIn, hover over your photo on the top right and click your name. You will also open up an editable profile if you hover over the white Profile link on the bar below the LinkedIn logo, which is slightly different but will also do the job. Here, you’ll see that you have you photo, tagline, physical location (city, state or greater xx area), current and most recent previous companies, the amount of connections you have (500+ could mean anything over 500), your shortlink and your summary. If you hover over any of these items, a little pencil will show up so you may edit them. You also have the option to upload a cover photo (I suggest something repeatable or a color that represents you).
Your photo does tell a thousand words. Use something personable, friendly, crisp, clean.. I actually decided to use this one since I got over 100 “likes” on Facebook when I uploaded it. If people like your photo on a social medium where you can gauge how it’s received, then it will make it easier for you to choose.
Notice all the ads. They’re irrelevant to this primer but they are most always related to what you’re putting in your profile and what you’re searching for. If you do decide to unlock a Premium membership by paying, make sure you have the right verbiage in initial marketing emails/landing pages/analytics/drip campaigns set up to measure the return on your investment. Don’t just buy something you’re not going to use properly. PS I can help with that 😉
Let’s chat a little bit more about that summary. This part is up to you. Do you want it to reflect your personality or do you want it to be 100% business? I believe that I’m selling to humans, and humans want to be appreciated and not talked down to, especially in a techish business. I try to keep mine friendly and humble.. and at the end, I mention a whole BUNCH of keyword phrases that will make me easily searchable in that top white box 🙂
Below, you will see an image–that’s the first image that it pulls from the link to whichever site you’ve linked to it. If you notice, that’s the top image on my homepage. A landing page would probably be a better idea if you’ve got one built, but I’m keeping this fairly simple.
Please stay tuned for my next blog post, Experience–or if you would like to sign up for my emails, fill out the form below!
It was only a matter of time before two people asked me the same question in one week, so I figured I’d just write a quick blog about merging your Facebook company pages 🙂
It’s a great idea to do since all of your reviews, ratings and check-ins will be combined (think of potentially exponentially growing your following in one fell swoop)–but keep in mind that the username, posts and photos will be deleted from the page that is merged from. There is no “undo” button here, people, so please make sure you do it right the first time!
First of all, make sure you have administrative access to all of the pages you’d like to merge. You can do a quick check of all the pages you manage by clicking here. Unfortunately this can be a hugely difficult task and take weeks to months of your valuable time. Facebook may even ask you for some ridiculous information to make sure it’s your IP.. including but not limited to calling you to make sure the # is correctly on file (this is the absolute easiest way to go about the process) or by submitting documentation which could include:
A utility bill for your place of business
Your local business license (issued by your city, county, state, etc.)
A tax file for your business
Certificate of Formation (for a partnership)
Articles of Incorporation (for a corporation)
Basically putting through a Place Claim Request is a huge pain in the a$$. And a waste of time and money it seems.. but really, it’s something that needs to be done so you may funnel all of your potential leads to the real page upon which you’ll be concentrating all of your marketing.
Here are some more quick links if you’re having an issue getting past this vital step:
So you go through the process of selecting your initial page that you want to KEEP and click that you Acknowledge that you will yadda yadda yadda wait up to 14 days and they have to both be published.. just read the fine print if you’re not sure what you’re doing please.
Then, you’ll have the opportunity to pick up to 5 pages you’d like to merge into your destination page. Once again, you can only merge those pages which you admin, so please go back to the step mentioned above if that’s not the case.
Click “Send.” Boom. Done. Well after waiting like 14 days if the pages aren’t similar, or potentially more if Facebook wants to give you a hard time. What else is new?
IF you’re having a hard time merging your pages after reading this article, please Contact x10industries and we’ll work with you to get this sorted out 🙂
Have a fantastic day and please feel free to comment with your Fan Page address so we may like it!
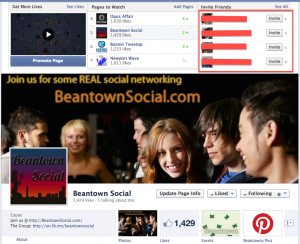
There’s a little piece of code that does it all. This will allow you to select all of your friends on Facebook to invite them to your event rather than click, click, clicking each individually. I suggest selecting friends from a specific geographic area since you don’t want to look too spammy in Facebook’s eyes.. As I stated in one of my last posts, I have no problem with you blocking event invitations from me, especially if you’re not planning on attending any of my events in the future. I’d rather be marketing to the people who appreciate these marketing attempts 🙂 However, I do hope that these posts help supplement my clients’ (and potential clients’) need to promote their events so they can geek out a little themselves!
So you’ve hosted a few events IRL (in real life). What happens when all of your potential guests’ attention is so deeply immersed in social media over the old mainstream resources that you’ve been used to advertising in over the years? You’re not going to reach them using your outdated tactics. It’s just a fact. You can be the most physically connected person in the world, but if you’re not able to socially/digitally leverage these connections, they’re not going to go to work for you, or help get the word out about your next event easily.
First of all, I suggest having at least 6 weeks of lead time to really publicize your event properly. It takes a while for buzz to get around town, but if you position a short and to-the-point press release properly and hit up your local content creators or aggregators with a write-up and link to your event (think newspapers, magazines, local event sites, chambers).. by blanketing your marketing and possibly offering these content creators gratis passes to your first event hinting that they write, photograph or take video around it, they may appreciate your invitation in more ways than one: first off, they’ll feel like they’re a part of something new and exciting that has a monetary worth (if paid) associated with it and secondly, you’ll be giving them another reason to create some fresh content that they’re truly interested in and :. their writing will reflect that to their readers.
FACEBOOK
You’re going to need to have a Facebook account. At the very least, you’ll need a personal page where you may add your high school, college, past careers’ connections, colleagues, family, friends.. etc. It truly depends on what space you’re in, but if you’re planning on being an event promoter, I’d suggest adding anybody whom you’ve ever gotten a name, email address/business card from.
The bigger and the more well-optimized your online social circles are, the greater your influence and the more powerful your marketing endeavors will be. And these circles will keep on exponentially growing if you’re doing it right.
Now that you’ve added your friends to your own populated personal profile and you actually start looking like a real person in your connections’ and Facebook’s eyes, you need to create a Fan Page associated with what your organization represents. If you already have a name for your company or what you’d like to call your event series, then you can start there. Visit the Create a Page Facebook resource to continue. I’m not going to go into what you should say to brand your event or company better on these next screens, but if you do need to chat and brainstorm about these ideas, I can make myself available on a consulting basis for your brand as a whole 🙂
Once you’ve created a Fan Page, you’re going to want to add all of your friends to that page in order to build your reach. I’m skipping a few critical marketing steps like actually having awesome content for them to see and understand your message once they find your page, but time is of the essence here and we need to get the word out about your event.
EVENTBRITE
Go create an Eventbrite account. Eventbrite has processed almost 200 million tickets thus far so odds are your potential sign-ups are familiar with the way their system works. In addition, Eventbrite will streamline your social media promotions (linking fairly seamlessly to Facebook and Mailchimp email campaigns among other mediums), checking in event-goers using their app and linking up the payment process to your business or personal PayPal account or one of their other payment processing options. Here are the features and resources on how to create your first event. I’ll wait. Go read it. It’s pretty self-explanatory and shouldn’t take you that long–but if it does and you’re getting frustrated already, you can reach out to me below for a meeting.. but this is more of your immediate route.
Eventbrite also created this handy article so that you may easily publish the event you’re promoting to Facebook, personally or as your fan page. You need to do this step so your Facebook event has an obvious link to purchase or reserve tickets embedded right on the the top of your event page. ::waits patiently while you read::
SHARING
Once you have your event in order (and here’s one more Eventbrite best practices article and a Facebook events resource before we go on), you’re going to need to share it with your friends and fans of the page. Here’s a handy dandy article I wrote on a quick hack to select all of your friends (in your geographical location only please) at once to invite your friends on Facebook to your event. I swear by this method and I suggest it to all of my event-promoting clients as a super time-saver. I also highly recommend throwing a couple of Facebook advertising dollars at each event post so it will be more visible to those people who aren’t yet connected to you or your fan page, but are within a target geographical area or demographic that you’re looking to build.
Once your event is published and live on both Facebook and Eventbrite and people have been invited to it, then all you have to do is sit back and wait for your event. False. You need to create consistent content around the perks of going to your event, the people who are connected and engaging with it, pertinent images, promotions, coupons, raffles, updates.. but you can’t do this too often. If you gave yourself the proper 6 weeks, then you should market to these people from that event barely once a week until a few days before and day-of the event. The issue here is that if you send updates too early and too often, event-goers can possibly ignore your updates and notifications altogether. You don’t want them to disregard your events before they’ve really taken off.
So I think that I’ve covered about as much as I can humanly get out without giving away all of my IP.. but if you still need a little direction, I can be hired out for an hour or two call to get you on the right track. Hopefully this serves as a primer to get your teeth cut in the world of social event promotion 🙂
Like/Comment/Share if you like what I have to say!
 Facebook offers a number of different options in creating your first page. If you have a physical location, click Local Business or Place. If you’re a Company, Organization or Institution without a physical location that people come to for service, click that button. A Brand or Product is like Nike or Budweiser. Artists, Bands or Public Figures if you’re a musician, politician or a writer. Entertainment if you are starting up a TV show, movie or are marketing a book not as a writer. Cause or Community if you’re a non-profit or have a networking group. There are tons of reasons to create your page to promote you or your idea, brand, product or service.. so pick what’s right for you. You can change it in the future if you do end up with a storefront or change to a non-profit. There are also sub-categories which you’ll have to choose from so choose wisely 🙂
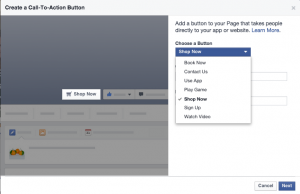 Messages: You can turn this on or off. I like to keep it on so that people can communicate through that button rather than trying to figure out the best way to reach you. Otherwise, a newer feature is the ability to create a new “Call to Action” button, to send people to your store, contact you directly on your site, download your app or have them sign up for your email list or event, watch a video, book services now or if you’d like to play a game.
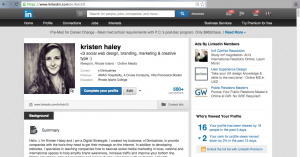
 Let’s chat a little bit more about that summary. This part is up to you. Do you want it to reflect your personality or do you want it to be 100% business? I believe that I’m selling to humans, and humans want to be appreciated and not talked down to, especially in a techish business. I try to keep mine friendly and humble.. and at the end, I mention a whole BUNCH of keyword phrases that will make me easily searchable in that top white box 🙂
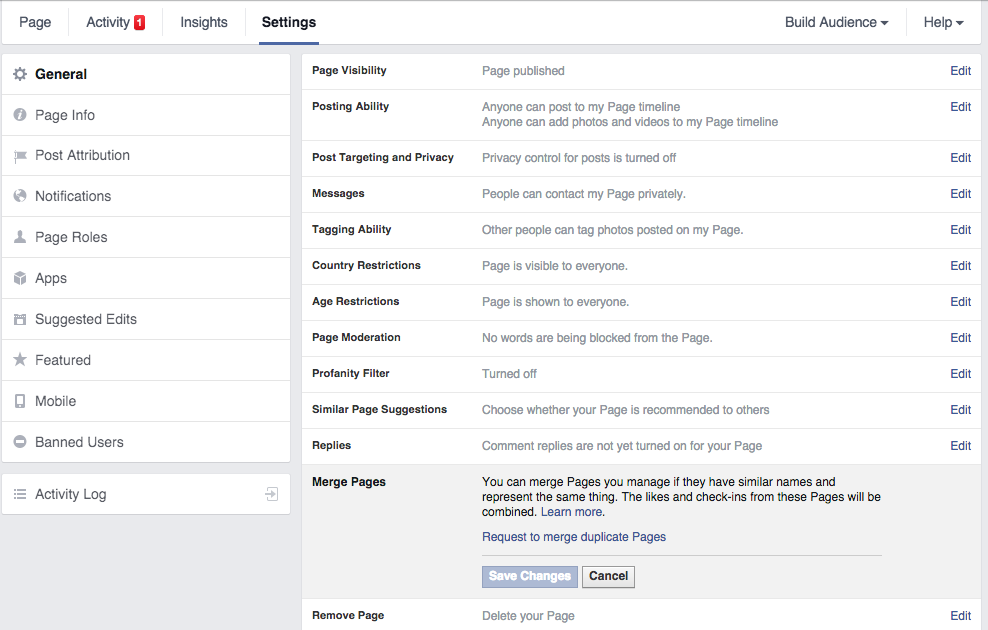
 You’re going to need to have a
 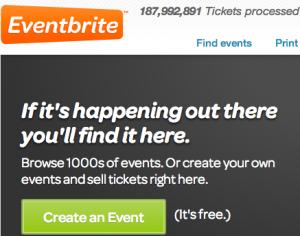 Go create an