![LinkedIn Primer for the Beginner who wants to look like a BOSS (part 1)]()
by kris10haley | Social Blog
First of all, I’m going to let you in on my little secret. I get A LOT of my business from LinkedIn. I have gotten clients from all over the globe from a degree or two of separation just from adding every email address from every business card or personal or professional email I’ve received or communicated with over the past 7 years. I understand that not everybody is going to be as aggressive as I have been in growing this sphere of influence, or their business is more locally-oriented and they’re more private people, but for a self-employed person who can technically work anywhere, this is my social medium of choice for virtual B2B networking and prospecting. Would you like to follow along? Click here for my LinkedIn profile.
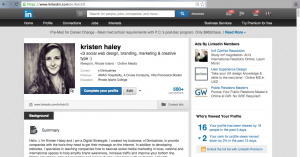
So let’s jump right on in and start with the first thing that people will see when they click to your profile while on a PC/Mac (not tablet/phone). I attribute this to be the most important real estate that you have to sell yourself. To get to this part of LinkedIn, hover over your photo on the top right and click your name. You will also open up an editable profile if you hover over the white Profile link on the bar below the LinkedIn logo, which is slightly different but will also do the job. Here, you’ll see that you have you photo, tagline, physical location (city, state or greater xx area), current and most recent previous companies, the amount of connections you have (500+ could mean anything over 500), your shortlink and your summary. If you hover over any of these items, a little pencil will show up so you may edit them. You also have the option to upload a cover photo (I suggest something repeatable or a color that represents you).
Your photo does tell a thousand words. Use something personable, friendly, crisp, clean.. I actually decided to use this one since I got over 100 “likes” on Facebook when I uploaded it. If people like your photo on a social medium where you can gauge how it’s received, then it will make it easier for you to choose.
Notice all the ads. They’re irrelevant to this primer but they are most always related to what you’re putting in your profile and what you’re searching for. If you do decide to unlock a Premium membership by paying, make sure you have the right verbiage in initial marketing emails/landing pages/analytics/drip campaigns set up to measure the return on your investment. Don’t just buy something you’re not going to use properly. PS I can help with that 😉
 Let’s chat a little bit more about that summary. This part is up to you. Do you want it to reflect your personality or do you want it to be 100% business? I believe that I’m selling to humans, and humans want to be appreciated and not talked down to, especially in a techish business. I try to keep mine friendly and humble.. and at the end, I mention a whole BUNCH of keyword phrases that will make me easily searchable in that top white box 🙂
Below, you will see an image–that’s the first image that it pulls from the link to whichever site you’ve linked to it. If you notice, that’s the top image on my homepage. A landing page would probably be a better idea if you’ve got one built, but I’m keeping this fairly simple.
Please stay tuned for my next blog post, Experience–or if you would like to sign up for my emails, fill out the form below!
Have a great week!
<3 kris10
by Kristen Haley | Social Blog
So you’ve hosted a few events IRL (in real life). What happens when all of your potential guests’ attention is so deeply immersed in social media over the old mainstream resources that you’ve been used to advertising in over the years? You’re not going to reach them using your outdated tactics. It’s just a fact. You can be the most physically connected person in the world, but if you’re not able to socially/digitally leverage these connections, they’re not going to go to work for you, or help get the word out about your next event easily.
First of all, I suggest having at least 6 weeks of lead time to really publicize your event properly. It takes a while for buzz to get around town, but if you position a short and to-the-point press release properly and hit up your local content creators or aggregators with a write-up and link to your event (think newspapers, magazines, local event sites, chambers).. by blanketing your marketing and possibly offering these content creators gratis passes to your first event hinting that they write, photograph or take video around it, they may appreciate your invitation in more ways than one: first off, they’ll feel like they’re a part of something new and exciting that has a monetary worth (if paid) associated with it and secondly, you’ll be giving them another reason to create some fresh content that they’re truly interested in and :. their writing will reflect that to their readers.
FACEBOOK
 You’re going to need to have a Facebook account. At the very least, you’ll need a personal page where you may add your high school, college, past careers’ connections, colleagues, family, friends.. etc. It truly depends on what space you’re in, but if you’re planning on being an event promoter, I’d suggest adding anybody whom you’ve ever gotten a name, email address/business card from.
The bigger and the more well-optimized your online social circles are, the greater your influence and the more powerful your marketing endeavors will be. And these circles will keep on exponentially growing if you’re doing it right.
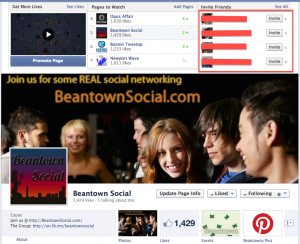
Now that you’ve added your friends to your own populated personal profile and you actually start looking like a real person in your connections’ and Facebook’s eyes, you need to create a Fan Page associated with what your organization represents. If you already have a name for your company or what you’d like to call your event series, then you can start there. Visit the Create a Page Facebook resource to continue. I’m not going to go into what you should say to brand your event or company better on these next screens, but if you do need to chat and brainstorm about these ideas, I can make myself available on a consulting basis for your brand as a whole 🙂
Once you’ve created a Fan Page, you’re going to want to add all of your friends to that page in order to build your reach. I’m skipping a few critical marketing steps like actually having awesome content for them to see and understand your message once they find your page, but time is of the essence here and we need to get the word out about your event.
EVENTBRITE
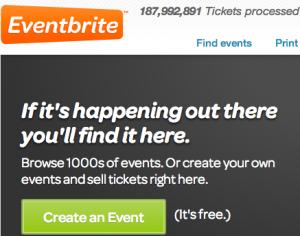 Go create an Eventbrite account. Eventbrite has processed almost 200 million tickets thus far so odds are your potential sign-ups are familiar with the way their system works. In addition, Eventbrite will streamline your social media promotions (linking fairly seamlessly to Facebook and Mailchimp email campaigns among other mediums), checking in event-goers using their app and linking up the payment process to your business or personal PayPal account or one of their other payment processing options. Here are the features and resources on how to create your first event. I’ll wait. Go read it. It’s pretty self-explanatory and shouldn’t take you that long–but if it does and you’re getting frustrated already, you can reach out to me below for a meeting.. but this is more of your immediate route.
Eventbrite also created this handy article so that you may easily publish the event you’re promoting to Facebook, personally or as your fan page. You need to do this step so your Facebook event has an obvious link to purchase or reserve tickets embedded right on the the top of your event page. ::waits patiently while you read::
SHARING
Once you have your event in order (and here’s one more Eventbrite best practices article and a Facebook events resource before we go on), you’re going to need to share it with your friends and fans of the page. Here’s a handy dandy article I wrote on a quick hack to select all of your friends (in your geographical location only please) at once to invite your friends on Facebook to your event. I swear by this method and I suggest it to all of my event-promoting clients as a super time-saver. I also highly recommend throwing a couple of Facebook advertising dollars at each event post so it will be more visible to those people who aren’t yet connected to you or your fan page, but are within a target geographical area or demographic that you’re looking to build.
Once your event is published and live on both Facebook and Eventbrite and people have been invited to it, then all you have to do is sit back and wait for your event. False. You need to create consistent content around the perks of going to your event, the people who are connected and engaging with it, pertinent images, promotions, coupons, raffles, updates.. but you can’t do this too often. If you gave yourself the proper 6 weeks, then you should market to these people from that event barely once a week until a few days before and day-of the event. The issue here is that if you send updates too early and too often, event-goers can possibly ignore your updates and notifications altogether. You don’t want them to disregard your events before they’ve really taken off.
So I think that I’ve covered about as much as I can humanly get out without giving away all of my IP.. but if you still need a little direction, I can be hired out for an hour or two call to get you on the right track. Hopefully this serves as a primer to get your teeth cut in the world of social event promotion 🙂
Like/Comment/Share if you like what I have to say!
Thanks again for reading and reaching,
Kristen

by Kristen Haley | Social Blog
I work with a lot of businesses on Facebook so :. I send out event invitations to events or to like pages on a consistent basis. I’m not sorry–I’m getting paid for this–but I want to make it easier for those of you who don’t appreciate my physically socializing this anti-social medium 🙂
Here’s a quick hack if you’d like to ignore anybody who is inviting you to events that you’re just not interested in but would still like to keep us as friends on Facebook. Let me be clear: I’m not offended by the fact that you’re ignoring my event invites; in fact, I’d rather only invite those friends who are planning on attending mine or client events in the future! Believe me, the events I promote do not suck 😉 However, if you’d rather just go to a website to see what’s going on in Newport, RI or Boston, MA, please visit these sites for tons of fun things to do in these towns:
First step: login to Facebook. You’re not going to be able to get anything done without this critical part. Der.
Secondly, visit this link to set up your blocking settings.
Here, you can:
- edit your Restricted User list
- block individual users altogether (they will not be able to see you or your activity if they’re logged in however you will not be able to see theirs as well)
- block application invites (individuals who are inviting you to Farmville or Mobsters alllll the time)
- block event invites (ding ding ding)
- block applications–especially useful if you’re getting tons of invites to Slotomania Adventures or Candy Crush Saga from multiple sources (thanks mom)
Just start adding the names of the event promoters who are inviting you to events you’d never join to your Block Application Invites section.
It’s that easy! If you like this article, please #payitfwd by commenting below <3
![LinkedIn Primer for the Beginner who wants to look like a BOSS (part 1)]()
by Kristen Haley | Social Blog
So you’ve been invited by your friend/employer to become an affiliate of an event to make some money promoting it. Supercool. First of all, I suggest you sign up for PayPal and opt to get a debit card so your cash can be liquid sooner than later when the affiliate money from each event has processed into your account.
You should have received an email by now that gives you a link to click in order to sign up for the program. Click “Join this program” to get started.

This will bring you to your affiliate page, where it will give you your own personal referral link which you must share in order to get credit. If you direct your friends to the original link, you will not get paid.
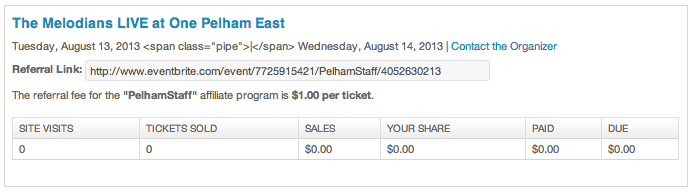
Take this link to Facebook, Google, LinkedIn, Twitter, your blog.. wherever you can post it to in order to make the most $ off of each event. If you keep an eye on your Referrals/Attendees page on Eventbrite, it will tell you how many people are clicking your link, how many tickets you’ve sold, your total sales, your share, and after the event, that which has been paid and that money which is still due.
Now rock it.
![LinkedIn Primer for the Beginner who wants to look like a BOSS (part 1)]()
by Kristen Haley | Social Blog
 So you’ve got your event published through Eventbrite.. and you’ve created an affiliate program for your employees or random affiliates.
Here’s how you go about showing your own internal promotional program:
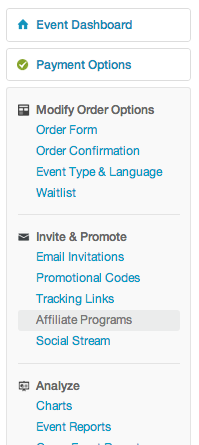
 First of all log into your Eventbrite Management Dashboard, which should be available when you log in if you’ve created an event. You should have these options to the left. Click on the “Affiliate Programs” link and click the green button that says “Create a new affiliate program.”
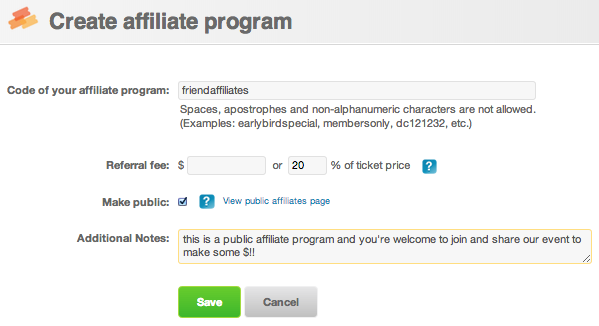
It should bring up a screen that allows you to input a code as well as add a referral fee or % of ticket price. You can make it public if you’d like your event to possibly be picked up by local promoters and add a few notes that the affiliate will see. Save it.
If you click on the link of your affiliate name, you should be able to see a link. Copy that link and forward it to your employees in an email that sounds something like this…
“You’re invited to become an affiliate of our event and receive 20% of all of your ticket sales when people use your link to view and pay for this event. Please sign up for PayPal to get paid. To accept this invitation to become an affiliate, please visit this link and sign up to receive your customized web address. Your referrals MUST use your individualized link in order for you to be paid, so please post everywhere, such as Facebook, Twitter, LinkedIn, Google+, your blog, etc.”
….
Now let’s look at it from the standpoint of your future affiliate.