![How to automate your social feeds]()
by Kristen Haley | Social Blog
First of all, you’re going to need to have a Facebook Page (personal or business) and/or Twitter account… but preferably both. Rather than walking you through setting up those social mediums, I’m just going to delve right into the syndication 🙂
Sign up for a Twitterfeed account and add your new feed by pasting the link from the originating site/aggregate. Don’t forget to test your RSS to make sure the feed parses before continuing!
Do you have a proper RSS link? If you notice that it doesn’t seem to work, then you can always create a Feedburner account and burn it (get a proper RSS link that works) using that service.

Click to Advanced Settings. I prefer it checking for new posts every 30 minutes to an hour, and I usually post 1 or two updates each time it checks. Depending on the feed, you can include title, description or both. I also prefer to shorten links using bit.ly so I may monitor another level of analytics which will also notify me if a ton of people are clicking on one of my shortened links.

There are a lot of other advanced options here, such as posting to LinkedIn and their corresponding thumbnail images, post sorting, optional prefixes and suffixes as well as a keyword filter. I’ll be skipping on by these for this project (that’s up to your need!). Click the button that says “Continue to Step 2.“
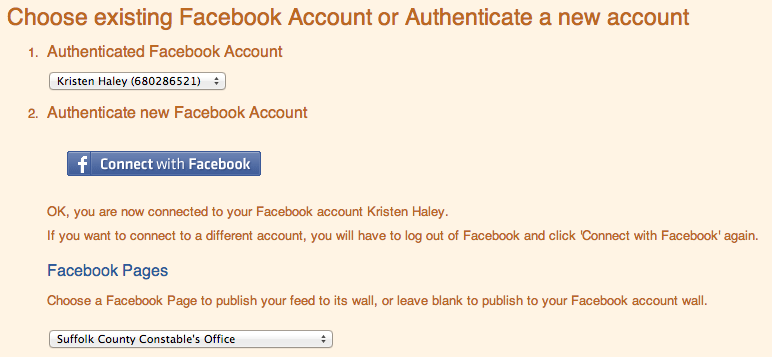
Step 2 is where you link your services. If you are already publishing from your Facebook Page to your Twitter, then you don’t need to double up on your mediums.. Here you can choose from Twitter, Facebook (pages, personal), LinkedIn (personal only), and app.net.
Authenticate your account and find the page that you’d like to publish to.
There are a couple more UTM Tag options here, but for all intents and purposes, let’s skip that and click “Create Service.”
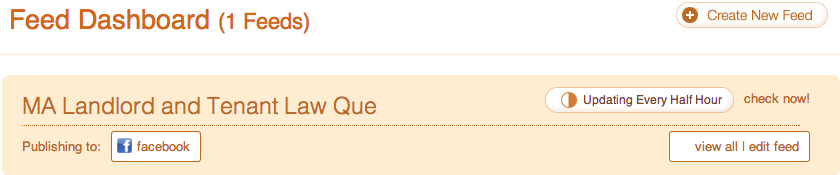
Now the feed should show up in your Twitterfeed Dashboard! If you know that the next posts are going to be coming out shortly, make sure you keep an eye on your feed over the next few hours to make sure it’s parsing properly.
Protip: Keep an eye on your feed on a daily basis if you don’t know where it’s coming from. You could be accidentally sharing some spammy posts. and that’s not good for your Kred nor your Klout o.O
Any questions or need me to help you set it up? Message me! -kris10
![How to automate your social feeds]()
by Kristen Haley | Social Blog
So you’ve been invited by your friend/employer to become an affiliate of an event to make some money promoting it. Supercool. First of all, I suggest you sign up for PayPal and opt to get a debit card so your cash can be liquid sooner than later when the affiliate money from each event has processed into your account.
You should have received an email by now that gives you a link to click in order to sign up for the program. Click “Join this program” to get started.

This will bring you to your affiliate page, where it will give you your own personal referral link which you must share in order to get credit. If you direct your friends to the original link, you will not get paid.
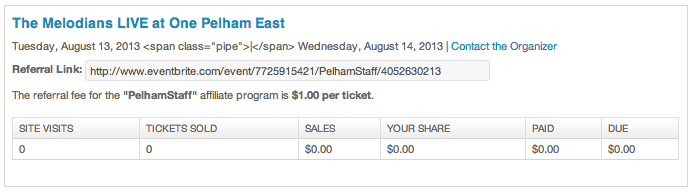
Take this link to Facebook, Google, LinkedIn, Twitter, your blog.. wherever you can post it to in order to make the most $ off of each event. If you keep an eye on your Referrals/Attendees page on Eventbrite, it will tell you how many people are clicking your link, how many tickets you’ve sold, your total sales, your share, and after the event, that which has been paid and that money which is still due.
Now rock it.
![How to automate your social feeds]()
by Kristen Haley | Social Blog
 So you’ve got your event published through Eventbrite.. and you’ve created an affiliate program for your employees or random affiliates.
Here’s how you go about showing your own internal promotional program:
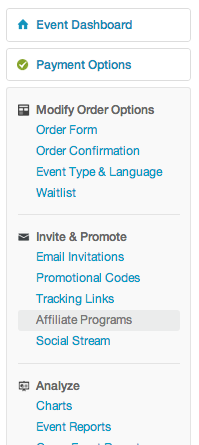
 First of all log into your Eventbrite Management Dashboard, which should be available when you log in if you’ve created an event. You should have these options to the left. Click on the “Affiliate Programs” link and click the green button that says “Create a new affiliate program.”
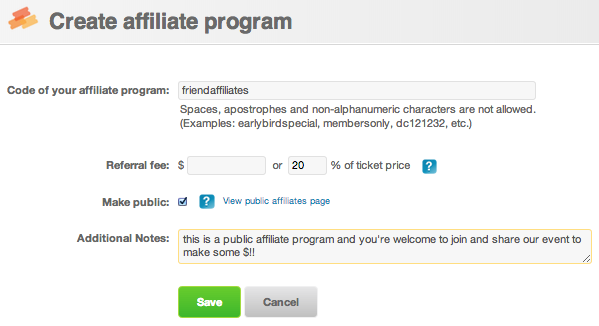
It should bring up a screen that allows you to input a code as well as add a referral fee or % of ticket price. You can make it public if you’d like your event to possibly be picked up by local promoters and add a few notes that the affiliate will see. Save it.
If you click on the link of your affiliate name, you should be able to see a link. Copy that link and forward it to your employees in an email that sounds something like this…
“You’re invited to become an affiliate of our event and receive 20% of all of your ticket sales when people use your link to view and pay for this event. Please sign up for PayPal to get paid. To accept this invitation to become an affiliate, please visit this link and sign up to receive your customized web address. Your referrals MUST use your individualized link in order for you to be paid, so please post everywhere, such as Facebook, Twitter, LinkedIn, Google+, your blog, etc.”
….
Now let’s look at it from the standpoint of your future affiliate.
![How to automate your social feeds]()
by Kristen Haley | Social Blog
It’s actually super important to back up your WordPress site or blog.. If you haven’t read the news lately, WordPress sites are becoming compromised and have been targeted by hackers because of easy-to-guess passwords or security flaws in outdated WordPress builds. WordPress pushes out a few updates a year, to ensure your site is pretty darn secure and you should definitely keep an eye on your Dashboard every couple of months…
So, after you’ve changed your password to include a CAPs and a # or a few of both, and notate it somewhere private, you can work to update and back up your WP build. You should not be logged into your site while you’re updating it. If anybody could possibly be working on your site at the time you’d like to update, please tell them to log out.
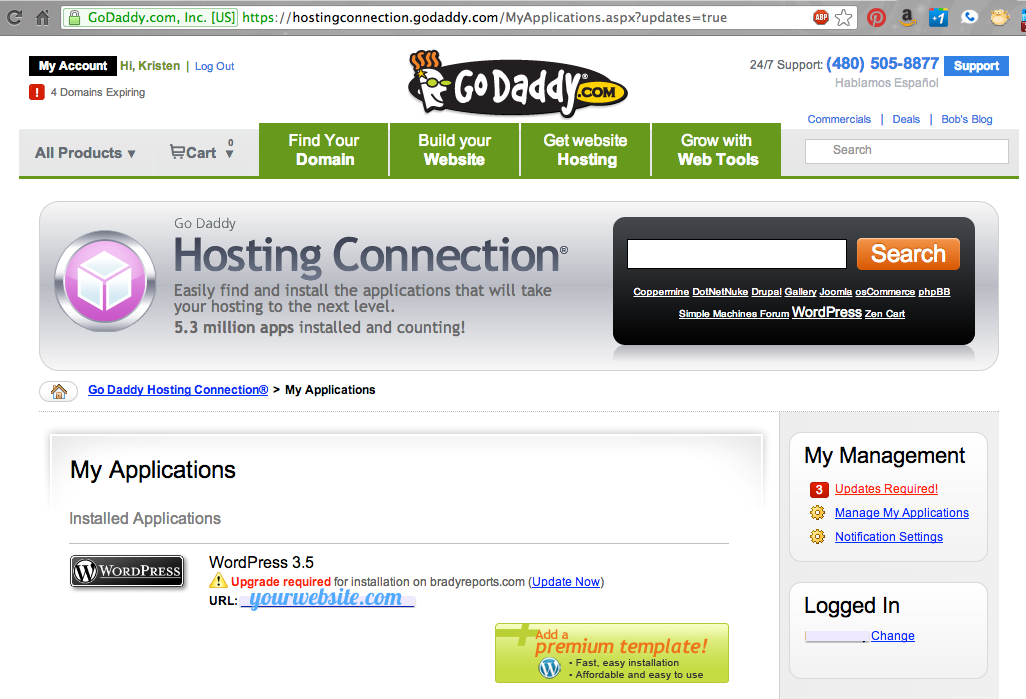 Log into your GoDaddy and click to your Hosting Connection Installed Applications that need updates.
Here’s a shortcut!
Click on “Update Now”
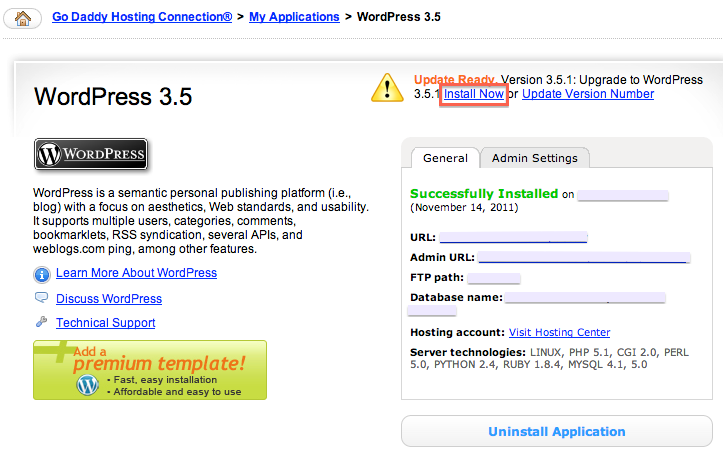
Then, you’ll be taken to a page where you can Install the new update… where you should click “Install Now.”
The next screen is simply going to walk you through the patch install update… Pretty much if you want it done without thinking so much, just keep clicking “Next” for the next two screens.. but this will explain them a little more…
Step 1: Patch install details
1) Backup the database,
2) Install the patch, and
3) Confirm the installation is successful
Step 2: Schedule patch
This will let you choose a time (the default is usually 5 minutes from now) where GoDaddy will back up your WordPress and upgrade your database. Click Next.
Now your installation request for WordPress has been submitted. The administrative email will receive a confirmation that the patch is complete.
**KEEP IN MIND***
IF you happen to be working with a custom-built theme, it may not play nicely with the newest version of WordPress.. you should contact us if you feel that your site is more complex so we may professionally assist you.
by Kristen Haley | Social Blog
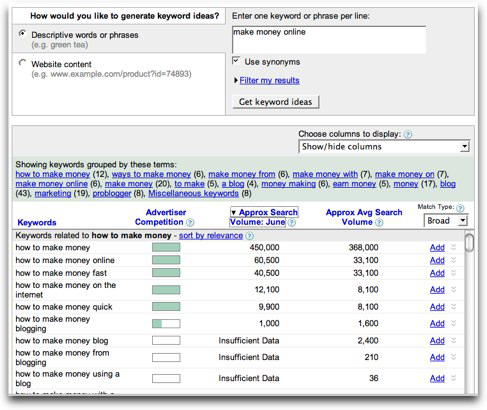
Ever wonder what keyword phrases you should use on your website? Check out Google’s Keyword Tool for Google keyword search. Super easy: All you have to do is type in a website you want to see how it’s doing so well in your market or phrases such as “Search Engine Optimization…”
(more…)